A kitchen remodel can transform how you cook, gather, and use your home—when you plan it right. Decide your priorities (function, budget, timeline) up front so every design choice and contractor decision supports a clear goal.
You’ll find practical guidance on planning the project, choosing layouts and finishes, and handling construction headaches without wasting money. Follow straightforward steps to balance style, storage, and workflow so your new kitchen works for daily life as well as resale value.
Planning Your Kitchen Remodeling Project
Start by clarifying what you need the kitchen to do and how much you can spend. In kitchen remodeling, prioritize functionality, smooth traffic flow, and the few design features that matter most to you to achieve a practical and visually appealing space.
Defining Your Remodeling Goals
List practical priorities first: cooking zones, storage capacity, and seating needs. Note specific items such as a 36-inch range, built-in pantry, or designated coffee station. Measure current cabinet storage and decide whether to increase volume or reorganize with pull-outs and drawer dividers.
Decide style features that affect cost: full-height backsplash, custom cabinetry, or integrated appliances. Identify must-haves versus nice-to-haves and mark any accessibility requirements, like lower countertops or pull-down shelves. Capture these goals in a one-page brief you can share with designers and contractors.
Setting a Budget
Start with a target figure that includes a 10–20% contingency for unseen issues. Break the budget into categories: cabinetry and hardware (30–40%), appliances (10–15%), countertops (8–12%), labor (15–25%), plumbing/electrical (5–10%), and finishes/lighting (5–10%).
Use a table to track spending:
Category | % of Budget | Notes |
Cabinets Hardware | 30–40% | Materials and installation |
Appliances | 10–15% | Range, fridge, hood |
Countertops | 8–12% | Quartz, granite, or laminate |
Labor | 15–25% | Contractor, carpenter, electrician |
Plumbing/Electrical | 5–10% | Relocation, fixtures |
Lighting/Finishes | 5–10% | Fixtures, paint, backsplash |
Get at least three quotes for major items and compare line-by-line. Lock in fixed-price bids for as many scopes as possible to reduce risk.
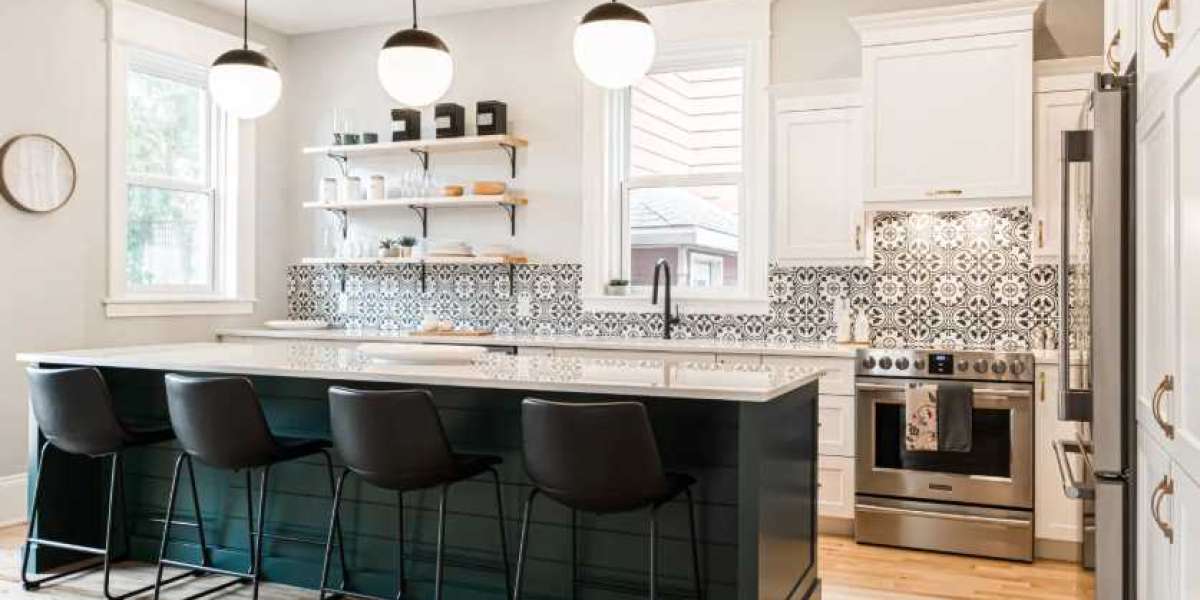
Choosing a Kitchen Layout
Choose the layout that suits your workflow: galley for compact efficiency, L-shape for open-plan flexibility, U-shape for maximal counter space, island layout for social cooking. Base the decision on your kitchen’s dimensions, traffic patterns, and the work triangle between sink, stove, and refrigerator.
Sketch the layout to scale or use simple planning software. Verify minimum clearances: 42 inches of aisle space for one-cook kitchens with an island, 48 inches for two-cook; 18–24 inches of counter each side of the range; and 30–36 inches clearance in front of major appliances. Plan for load-bearing changes, venting, and plumbing relocation early, since these drive timeline and cost.
Timeline and Project Management
Map the project phases with realistic durations: design and permits (2–6 weeks), demolition (1–3 days), rough-in plumbing/electrical (1–2 weeks), cabinetry and major installations (2–4 weeks), finishing work (1–2 weeks). Add time for permit approvals and product lead times, especially for custom cabinets and appliances.
Assign a single point of contact—either you, a project manager, or the contractor—to handle scheduling, approvals, and change orders. Keep a simple checklist and photo log to document progress and decisions. Schedule weekly check-ins and confirm deliveries 48–72 hours before installation to prevent delays.
Design and Renovation Essentials
Focus on durable, low-maintenance choices that match your daily routines and budget. Prioritize workflow, storage, and lighting so the space performs well for cooking, cleaning, and entertaining.
Selecting Materials and Finishes
Choose surfaces by wear patterns: select quartz or granite for high-use countertops because they resist staining and scratching better than softer materials. For backsplashes, porcelain or glazed ceramic tiles stand up to grease and are easy to wipe clean. Pick flooring that balances durability and comfort — luxury vinyl plank (LVP) or porcelain tile for spill resistance, or engineered hardwood if you want warmth with greater moisture tolerance than solid hardwood.
Match finish families to hide wear: matte or textured cabinet finishes show fewer fingerprints than high-gloss. Use high-traffic grade paints (scrubbable, satin or semi-gloss) on walls. Request samples and test them under your kitchen’s lighting before committing.
Cabinetry and Storage Solutions
Design cabinets around daily tasks. Store frequently used items like plates and prep tools between waist and eye level for easy reach. Install deep drawers for pots and pans instead of lower shelves; pull-out trays reduce bending and maximize access.
Include specialized storage: vertical dividers for baking sheets, pull-out spice racks near the cooktop, and a pantry with adjustable shelves for bulk items. Use soft-close hinges and full-extension slides to protect hardware and improve access. If space allows, add an appliance garage to keep countertop appliances tidy but accessible.
Lighting and Fixtures
Layer lighting: combine task lighting over work zones, ambient ceiling fixtures for overall light, and accent lighting for display areas. Under-cabinet LED strips deliver focused illumination for countertops and reduce shadows while conserving energy.
Select fixtures by lumen needs rather than watts. Aim for 300–500 lumens per square meter in prep areas. Choose a high-quality faucet with a pull-down spray and ceramic disc valve for durability. Match finish styles—for example, brushed nickel or matte black—to cabinet hardware for a cohesive look.
Sustainable Remodeling Options
Prioritize long-life materials and local sourcing to lower environmental impact. Choose Energy Star-rated appliances; they cut utility costs and reduce energy use. Opt for reclaimed or FSC-certified wood cabinets to support responsible forestry.
Incorporate water-saving fixtures: faucets with flow rates at or below 1.5 gallons per minute and dual-flush toilets if you remodel adjacent spaces. Specify low-VOC paints, sealants, and formaldehyde-free cabinetry to improve indoor air quality. Finally, plan for recycling construction waste—set aside space on-site for separated bins for metal, wood, and drywall.