If your embroidery designs consistently produce poor results, the issue may not be your machine, thread, or fabric. In many cases, the problem starts with the stitch file itself. A properly prepared embroidery file helps machines create clean, accurate, and durable designs, while poorly prepared files often lead to costly production issues.
Understanding the warning signs early can save time, reduce material waste, and help you achieve better embroidery results on every project.
Why File Preparation Matters in Embroidery
Embroidery machines follow instructions exactly as they are programmed. They cannot automatically fix design flaws, adjust stitch density, or compensate for fabric movement.
This is why Professional Custom Digitizing plays an important role in embroidery production. It transforms artwork into a stitch-ready format that is optimized for the specific design, fabric, and application.
When files are prepared correctly, embroidery looks cleaner, runs more efficiently, and maintains consistent quality across different products.
Sign #1: Your Logo Doesn't Match the Original Artwork
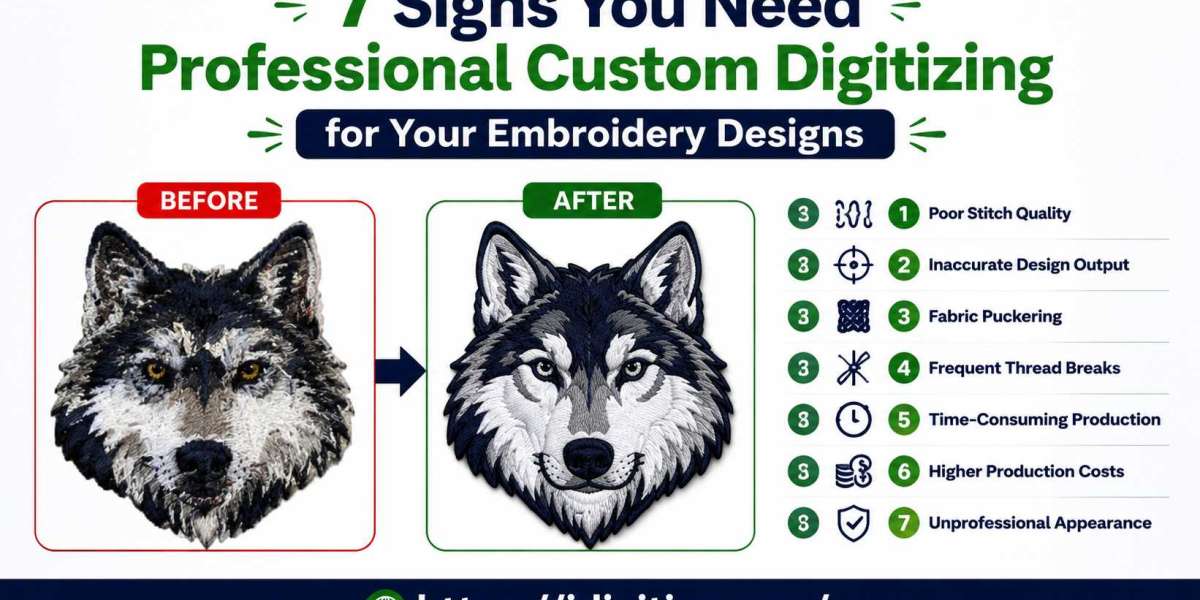
One of the clearest signs of a file problem is when the stitched version looks noticeably different from the original design.
Common Issues
- Shapes appear uneven
- Fine details disappear
- Borders look inconsistent
- Design proportions change
Why It Happens
Artwork created for print or digital use often needs adjustments before it can be embroidered successfully. Without those adjustments, important design elements may be lost during stitching.
Sign #2: Small Text Is Difficult to Read
Text is one of the most challenging elements in embroidery.
Warning Signs
- Letters blend together
- Small fonts become blurry
- Characters lose definition
- Words become unreadable
The Real Cause
Many files are created without considering how stitches behave at small sizes. Proper stitch planning improves readability and preserves important details.
Sign #3: Thread Breaks Happen Frequently
Frequent machine stops can slow production and increase labor costs.
You May Notice
- Constant rethreading
- Interrupted production runs
- Uneven stitching quality
- Increased machine downtime
What's Behind It
Poor stitch sequencing and excessive density often create unnecessary stress on embroidery machines and thread.
Sign #4: Fabric Puckers Around the Design
Puckering occurs when fabric gathers or wrinkles around stitched areas.
Common Examples
- Polo shirts wrinkle around logos
- Lightweight garments lose shape
- Designs appear raised or distorted
Why This Happens
Incorrect underlay settings and poor stitch density can create excessive tension on fabric, causing visible distortion.
Sign #5: Results Vary Between Garments
A logo should look consistent whether it's stitched on shirts, jackets, caps, or bags.
Signs of Inconsistency
- Different appearance on each product
- Uneven stitch coverage
- Variations in shape and size
- Inconsistent branding
Why Consistency Matters
Customers notice when logos and branding elements look different from one item to another. Consistency helps maintain a professional image.
Sign #6: Designs Feel Too Heavy or Stiff
Embroidery should be durable, but it should not make garments uncomfortable.
Common Problems
- Thick embroidery patches
- Rigid stitched areas
- Reduced fabric flexibility
- Uncomfortable wear experience
The Underlying Issue
Overloading a design with unnecessary stitches can create excess weight without improving appearance.
Sign #7: Production Requires Constant Fixes
If every order requires troubleshooting, there may be a deeper issue with the embroidery file.
Common Production Challenges
- Repeated adjustments
- Multiple sample runs
- Excessive material waste
- Longer completion times
Why It Matters
Small problems become expensive when repeated across large production runs. Improving file quality often solves recurring issues before they affect profitability.
How Expert File Creation Improves Embroidery Quality
When designs are prepared by experienced specialists, several important improvements become possible.
Better Stitch Placement
Strategic stitch planning improves accuracy and visual appeal.
Improved Fabric Performance
Settings are adjusted based on the material being embroidered, helping designs maintain their intended shape.
Reduced Machine Downtime
Efficient stitch paths help minimize thread breaks and unnecessary machine stops.
Cleaner Finished Products
Well-constructed files produce sharper details and more consistent results.
Step-by-Step: What Happens During the Process
Step 1: Artwork Evaluation
The original design is reviewed to identify potential embroidery challenges.
Step 2: Design Optimization
Elements that may not stitch well are adjusted while preserving the overall appearance.
Step 3: Stitch Assignment
Appropriate stitch types are selected for different areas of the design.
Step 4: Compensation Settings
Adjustments are made to account for fabric movement and stitch pull.
Step 5: Test Stitching
A sample run helps identify any issues before production begins.
Step 6: Final Refinement
The file is optimized for efficient machine performance and high-quality results.
Practical Examples
Corporate Uniforms
Businesses need logos that appear professional and consistent across multiple garment types.
Sports Apparel
Team uniforms require durable stitching that can withstand frequent washing and heavy use.
Promotional Products
Branded merchandise benefits from clean embroidery that reinforces company identity.
Fashion Brands
Decorative embroidery often requires precise stitch planning to achieve a premium appearance.
Pros and Cons
Pros
- Better design accuracy
- Improved text readability
- Reduced production errors
- Greater consistency across products
- Less material waste
- Stronger brand presentation
Cons
- Requires additional preparation time
- Higher-quality services may cost more initially
- Complex designs sometimes need revisions
Common Mistakes to Avoid
Using Low-Resolution Artwork
Poor source files limit the quality of the final embroidery.
Ignoring Fabric Differences
Different materials require different stitch strategies.
Choosing Speed Over Quality
Rushing file creation often leads to production problems later.
Skipping Test Runs
Testing helps catch issues before full production begins.
Depending Entirely on Automation
Software can assist the process, but complex designs usually benefit from human expertise.
Expert Tips for Better Results
Start with Clean Artwork
High-quality artwork creates a stronger foundation for embroidery.
Share Production Details
Provide information about garment type, placement, and design size.
Simplify Overly Complex Designs
Removing unnecessary details often improves stitch quality.
Request a Sample Stitch-Out
Testing allows adjustments before committing to large orders.
Work with Experienced Specialists
Professional Custom Digitizing services can identify potential problems before production starts, helping save both time and money.
Why Investing in Better Files Pays Off
Many businesses focus on embroidery machines and thread quality while overlooking file preparation. However, the embroidery file acts as the blueprint for the entire project.
A properly prepared design reduces errors, improves consistency, and helps create embroidery that accurately represents your brand. This is why Professional Custom Digitizing remains one of the most valuable investments for businesses that rely on embroidered products.
Conclusion
Poor embroidery results often leave clear warning signs. Unreadable text, distorted shapes, thread breaks, fabric puckering, inconsistent branding, stiff designs, and ongoing production issues can all point to problems within the stitch file.
Recognizing these issues early allows businesses and embroidery professionals to make improvements before they become costly mistakes. Investing in Professional Custom Digitizing can help ensure cleaner stitching, smoother production, and a more professional finished product.
This article is based on embroidery industry knowledge and practical production experience. Processes, software capabilities, and service pricing may vary by provider and should be verified through current sources when making purchasing decisions.
FAQs
1. How can I tell if my embroidery file needs improvement?
Signs include poor detail, unreadable text, thread breaks, puckering, and inconsistent results across different garments.
2. Why does my embroidered logo look different from the original design?
Artwork often requires adjustments before stitching. Without proper preparation, details and proportions can change during production.
3. Can better file preparation reduce machine problems?
Yes. Optimized stitch paths and balanced density settings can reduce thread breaks and machine downtime.
4. Is every embroidery design suitable for automatic software conversion?
Simple designs may work well, but detailed logos and complex artwork often require manual adjustments for the best results.
5. Does quality digitizing improve consistency?
Yes. Properly prepared files help maintain a uniform appearance across different garments, materials, and production runs.